Do you already have a professional email, that is, an email with its own "domain"? Because today I'm going to show you how, step by step, you can also have a professional e-mail, spending as little as possible.
Hi, if this is your first time here, our content is focused on INNOVATION FOR LAWYERS and, in particular, this series is focused on LEGAL MARKETING.
I also present to you guys and girls the video I made on this topic from my YouTube channel, which is where I share some thoughts, tips and projects I am currently working on with other tech-fanatics, whether you are a developer, lawyer or enthusiast. Please also consider subscribing to my channel to not miss future videos and to join our live "coding sessions" and a nice, relaxing tech-related chat -- I promise to keep things interesting. The content is in Portuguese, but you can watch my videos with subtitles (maybe I will switch to English in the future, if this makes sense).
josephmanninglaw@hotmail.com
ou
info@josephmanninglaw.com
Certainly, the second format gives a more "professional" air by using your own domain, even though it has nothing to do with the quality of work or professionalism of our lawyer Joseph (if you own the email above, Joseph, I am sorry - - any resemblance to reality is pure coincidence).
 |
| A beautiful card but an ugly email... |
REGISTERING AN INTERNET DOMAIN
Okay, so this is the "paid" part of this guide.
To have a "professional" domain, that is, a domain other than hotmail.com, gmail.com and the like, you will need to register a domain in your name, preferably something .com or .net, which are the most common domain endings you'll see on the internet and that most people will remember. There are other options (like this blog itself which has ".lawyer" at the end) but choosing a different domain is something you should only do if you have a good choice.
Want to see step by step how to buy a domain on the Internet? See our content: How to register a Professional Internet domain
SETTING UP YOUR DOMAIN TO USE A PROFESSION EMAIL IN GMAIL
Now that you already have a registered domain, I'll show you how to use it to get an email account right in your Gmail.
When looking for what other pages and channels that deal with the subject raise as possibilities, many say that you need a hosting service (or at least an email server) to have a professional email with your new domain.
Today I'm going to show you how I setup my domains to use them professionally together with Gmail, without having to subscribe to another service such as web hosting.
A. Email Forwarding
1. If your domain is registered with Google Domains
If you've registered your domain on Google Domains, it's all simpler since Google itself already provides this email forwarding service.
To set the forwarding, you just have to access your domain's settings in Google Domains, click on the "Email" menu and create an email alias: the intended address and where to redirect the emails.
 |
| Access your domain by clicking its name |
 |
| Create an email Alias setting up the address you want and where to forward it |
If I email now my example alias, falecomigo@dev.lawyer, I should receive it in my Gmail inbox.
| And voilá, it is working! |
2. If your domain is registered elsewhere
If your domain is registered elsewhere and does not have an email forwarding service, we will need to use a different approach, such as in my case with Registro.br for my .com.br domains (not supported by Google Domains).
 |
| My Brazilian registration service does not provide email forwarding |
Email Server
To set up our professional email we will need an email server. An email server basically receives all emails forwarded to a certain address and redirects it according to the established settings.
In the case of Google Domains, they already offer an email redirection service as we have seen, but as the service does not support .com.br addresses at the moment, we will need some other service to fulfill this role.
We are going to use a free service called Forward Email. Make your free registration on the site informing your purchased domain (you can uncheck the option for additional protection) and create the new entries it indicates in your domain registration service. You must add 2 MX entries and a TXT record as instructed on the Forward Email page after you create the account:
 |
| Creating your account and adding a new domain |
 |
| The service provides instructions on new entries to be created in your registration service |
 |
| Records in regsitration service |
 |
| Update your records |
 |
| Registros OK |
A. Sending emails from your new professional email
Enabling Two-Step Authentication and Creating an App Password
First, you must go to your Google profile page, click on the "Security" menu, and finally search for the portion dealing with 2-step verification and activate it by linking your phone.
 |
| First enable 2-step verification |
 |
| Verification set |
Now, let's create an app password for our Gmail: just go back to the Google security section and click on the corresponding option:
 |
| Vamos criar uma senha de app |
 |
| Choose a custom name for our app |
 |
| And write down the generated password |
Setting up your Gmail account
Now let's set up ours in Gmail: click the gear and "Show all settings" in your Gmail.
 |
| Acesse as configurações do seu Gmail |
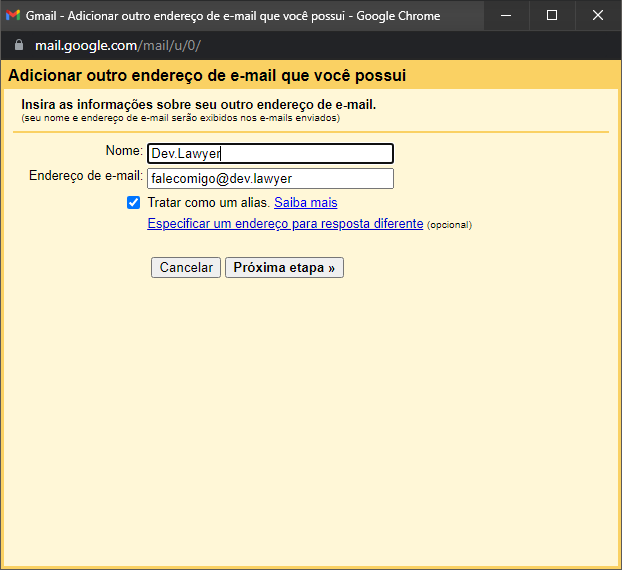
Then click on the "Accounts and Import" tab and in the "Send emails as:" section click on "Add another email address".
 |
| Add a new sending email |
 |
| Set the name, fill in the email alias we created in Google Domains and leave the "Treat as an alias" box checked |
 |
| For SMTP Server use smtp.gmail.com and for credentials, use your Gmail email even with the password generated in the apps password we made |
 |
| Now just enter the code of the email that Gmail will send you to finish the process And finally we can answer our emails with our professional address as well 😁 CONCLUSION¶ |
 Reviewed by Octavio Ietsugu
on
September 04, 2021
Rating:
 Versão em Português


No comments: