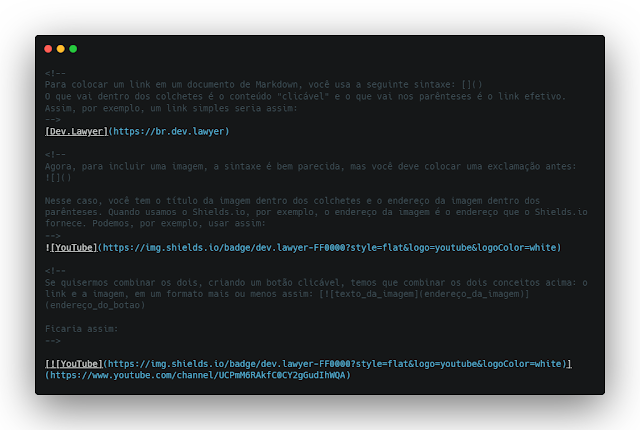
1. Badges
Let's start with something I did before but forgot to comment: how to put "badges", which are these images to highlight social networks, programming languages, statuses and everything else you want, like this one: 
You could generate these images manually in an image editor like Gimp. However, the Shields.io website allows you to generate these images in a very practical way, just by passing some information in an internet address.
The site has many interesting options worth exploring, and you can even create your own custom badges. To create your badges, you can go to the Shields.io website directly and click on the link you want to create: for example, you can create a views badge for your GitHub profile by clicking the "social" link on the homepage and then on the corresponding badge. A screen for you to fill in the required data will open:
And so you will have a badge with these parameters:

There are other possible options in Shields.io, so just explore the possibilities a bit. To create a custom badge, just create an image with the following syntax:
The "label" being the message on the left, the "message" the message that follows on the right and the "color" the highlight color for your badge. For example:
To include these badges in your GitHub profile you will need to edit the repository's README file with the same name as your username, in Markdown format. To do this, you can use the following format:
 |
| The markdown code: you can see the full Markdown in the GitHub gist below by clicking on "View Raw" |
That way you can create badges for every social network link you want, or even create custom badges for programming languages you master, like the one I used to show that I use Angular here:
And the final result:
2. "Above the Fold" and CTA
Unlike a README of a project (in which you would do well to follow some layout patterns to not leave your visitor lost), in the README of your GitHub profile there is not much of a rule: there are people who put photos, GIFs, games of chess, snake animation and more. You're kind of free to do what your imagination (and Markdown's GitHub restrictions) allow.
Looking at it this way, we can even look at the GitHub profile as a personal page, where WE CALL THE VISITOR'S (and perhaps a recruiter's) ATTENTION to our skills, experiences, tastes and projects. So it makes sense to treat our GitHub profile page as a sort of "landing page" or "professional website" but with the focus on our developer skills.
With that in mind, let's customize our profile page to incorporate the basic web design concepts we've covered in our past content: short important information above the fold, with a clear CTA, separating the rest of the topics into their own, well-illustrated and self-explanatory sections.
Adjusting our header
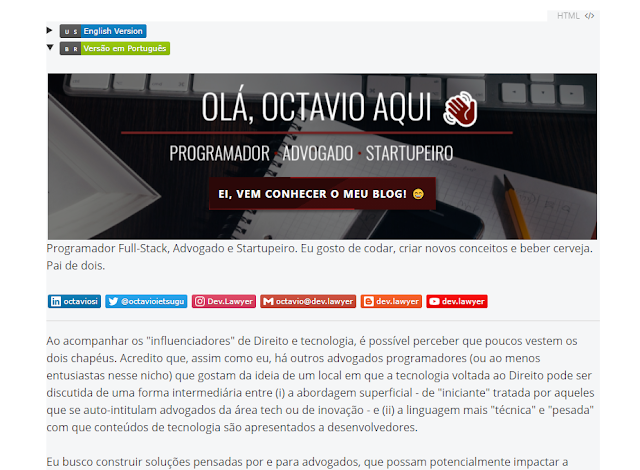
Our current header isn't as far from what I think is enough for above-the-fold content: it has few words but it describes well who I am and what do I do: my name and the fact that I'm a developer/lawyer/startup founder. In your case, I recommend taking a similar approach:
make a brief introduction and put your "value proposition" or, in other words, why your profile should draw attention. In principle we could do everything through images, editing our header in an image editor like
Gimp or
Canva.
 |
| My current header: come on, it's not that bad... |
However, I want to change this header slightly to make a clear Call to Action (CTA). I want to put a button that when the visitor clicks they will be taken to this blog.
Normally this would be an easy task: in the HTML of the page we would just put a <div> element that contains the header image as the background style, and the content would have the phrase we defined and the button for the Call to Action.
Obviously, I want our button to be really flashy, stylized, so that it looks "pretty". But I did some research on the subject and Houston. we have a problem here: For security reasons GitHub removes any existing scripts and style tags in the code. In other words, we are limited to using "pure" HTML. Or is it?
The simplest way, therefore, would be to simply create a clickable header image and, if you need some animation, you could do that with a GIF and post it there instead of the page. But let's see if we really can't use CSS on GitHub...
Can I use styles (CSS) in my GitHub README?
Look: GitHub doesn't allow you to use javascript or CSS scripts, automatically removing tags like that before rendering the final result.
However, it does allows you to use images, including SVG files. SVG files are "vectorized" image files, that is, images that contain the necessary information so that they can be assembled. This allows, for example, that an SVG image can be enlarged to infinity without losing quality, as it is not composed of pixels, but of calculations.
You can, for example, have an image like this in your README:
And as we mentioned before, you can "assemble" this SVG image with code. Let's open any SVG image in the code editor so you can understand what I'm saying (if the code doesn't appear below, click on "View Raw"):
As you can see, SVG is nothing more than a series of instructions for the computer to assemble the images. And this opens up a "hole" for us to put in these instructions some styles to customize our header.
You can use inside your SVG a <foreignObject> tag, and inside that tag you can use HTML, including style tags. Basically, you'll put a <foreignObject> tag inside the SVG tag and inside it you can then define <style> and the other HTML elements:
However, there are many limitations to doing this. We were able to put in our code images that use an SVG that has its own defined styles, but I couldn't do several things that I wanted, and it took some adaptations to make everything work as I needed.
To better understand how this was done, I recommend that you take a look at the code from our SVG image that I made available in the GitHub repository for my profile, and which is commented out step by step (sorry guys, only Portuguese for now, but you can Google Translate it).
It sounds simple, but it wasn't. See the "raw" of the file above to understand how I did it, noticing that the comments of the files always complement what is provided here (even though in Portuguese). And our header is finally ready.
 |
| Our header: in the final version it is animated by CSS |
Other README.md sections
As mentioned earlier, we are free to change the view of our GitHub profile to make it unique. And I decided that I would use my space to create a "visual curriculum" regarding what I do 😃
The process of including other sections is basically the same as with the header: use little text but highlight information that is important for your visitor to better understand your profile.
3. Multiple Languages
Our third customization will be to create our profile in both English (which is the language most GitHub users use to communicate) and Portuguese (my mother language).
I understand that this customization is important as you want to have a profile accessible to everyone in the English world, but it may happen that many of your potential visitors are local. So a good alternative is to have both options. In my case, I intend to put in both languages only the initial written text that I deem important for those who want to know more about my profile.
To create our profile with multiple languages we will use in our Markdown the tag <details>, which allows us to place content inside a "collapsible" section. This is HTML, and it looks like this:
1
2
3
4
5
6 | <details>
<summary>
Section Title
</summary>
Section Content
</details>
|
As you can see, you can define the title the section will have using the <summary> tag, and the content always below it.
Important notes: don't skip lines between each section and if you need any elements like links, images and the like, use HTML inside that section: Markdown syntax won't work.
After creating two sections with details (choosing to leave the section in English as default and "open", using <details open> for that) and putting images generated in Shields.io in the summary, my GitHub profile file looks like this:
 |
Multi language profile
|
You can create other sections in your README, even to make it "cleaner" if you prefer, putting information in separate and hidden blocks so as not to take up as much space on the screen. It all depends on your imagination and patience... 😊
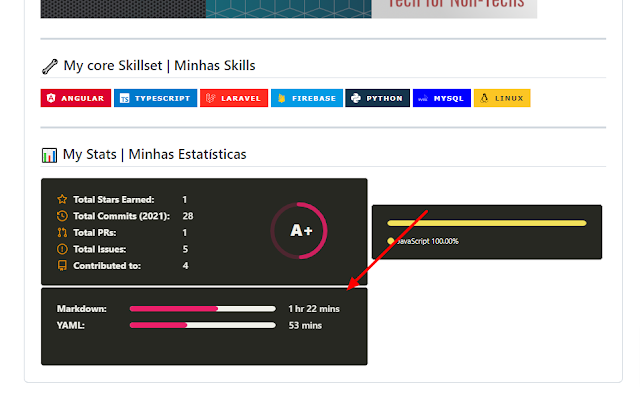
4. Development Metrics
We can also create development metrics, that is, metrics about your dev routine. This opens up some more possibilities and gives the profile a really cool look. Let's use a very good repository here for that, which can be found here:
https://github.com/anuraghazra/github-readme-stats#wakatime-week-stats (actually the same used in our previous content).
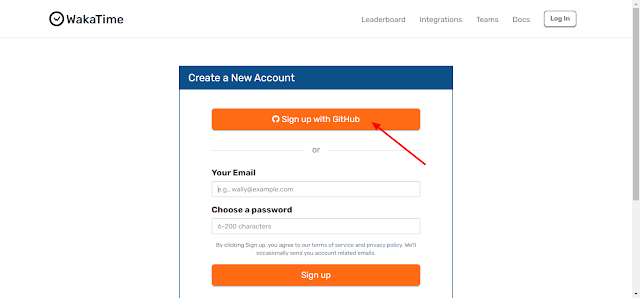
To do this, let's first create an account and credential on the
WakaTime website.
Click Log In and Sign Up to create your account
 |
I've created my account via GitHub login
|
After creating your account, view and copy your API key by visiting this address:
https://wakatime.com/api-key
Install the WakaTime extension on your VSCode as well. After installing and restarting VS Code, it will ask you for the API Key to start tracking your programming.
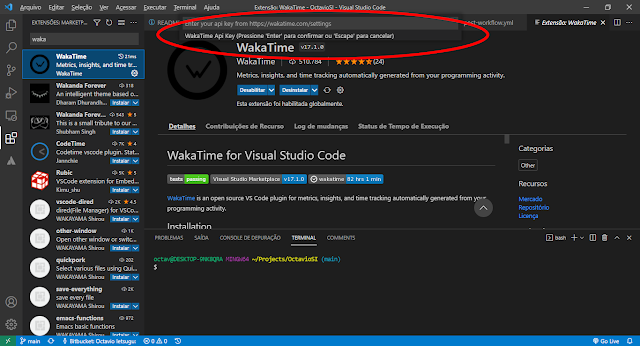 |
| After installing the extension and restarting VSCode, it will ask you for the API Key |
With that, WakaTime will start counting the programming time and languages you used to feed its metrics.
In your profile repository README.md, include the following where you want to see the metrics:
1 | <img align="center" src="https://github-readme-stats.vercel.app/api/wakatime?username=OctavioSI&theme=monokai&hide_title=true&layout=default" />
|
Just change the username to your username there on WakaTime and you're done! You will have new development metrics in your profile, updated as your actual activity is now recorded by VSCode! Note that your WakaTime status can take a long time to update, so if nothing shows up, be patient and soon it will be there.
There are other repositories that use WakaTime data, but this one's implementation is simpler and we've used this same repo before for GitHub statistics in the first GitHub customization tutorial.
5. Showing your latest Tweets
If you are a compulsive Twitter user like me (follow me there: ), it might be interesting to have your latest posts appear on your profile.
To put your latest tweets in your README, just insert this in your markdown, changing the one after the id to your username (in my case, ?id=octavioietsugu):
1 | 
|
And that's it, your profile should now show your latest tweets:
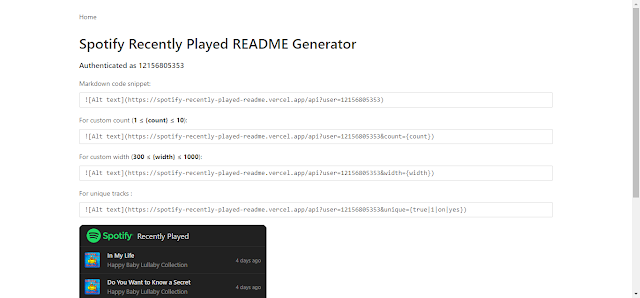
6. Showing your Spotify
Maybe your musical taste is something you want to show a potential recruiter (perhaps)? 😂
To do this, just open the app that JeffreyCA created (you can choose to launch the app in your own Vercel installation if you like, there's a button there in the repo that shows this) and authorize your Spotify account:
Once authorized, just copy the markdown it provides on the page and paste it into your README:
 |
| Don't bother with the children's songs, but I have an Alexa and two babies... |
With that your Spotify should appear on your profile too:
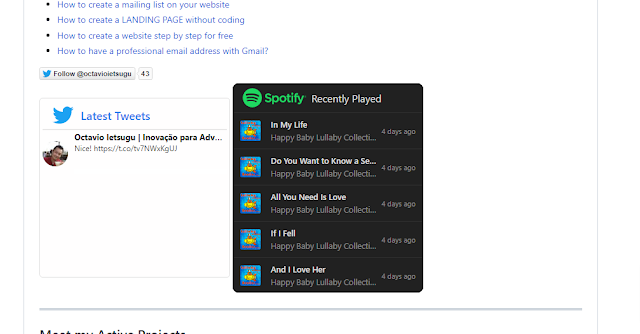 |
| With Spotify |
Anyway, it can be done, but does it make sense to you? After all, it's not because we can do it that we should do it, right?
In my case I took it off, since I can't keep this list of children's songs there lol 😂 I also took the Twitter one off because it seemed to me that it was a little too much. Mind your own taste tough, and if you think you should, go for it, champ!
👉 "AUTOMATED " CUSTOMIZATIONS
Now let's see another customization that uses "automations" on GitHub, through integrations, APIs and
GitHub Actions. GitHub Actions allow you to run scripts periodically and thus be able to update metrics and other data dynamically.
We'll use it again today, but with one "twist" I haven't seen around...
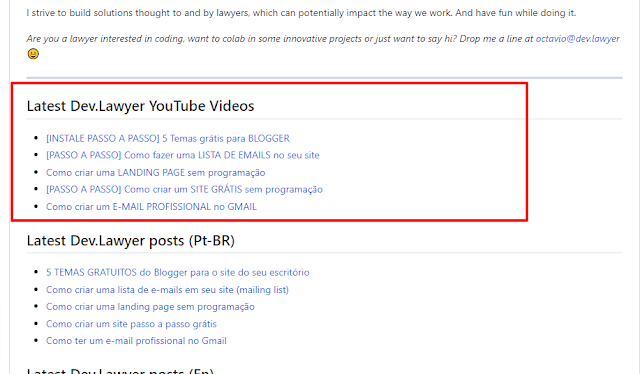
7. Enhancing YouTube listing
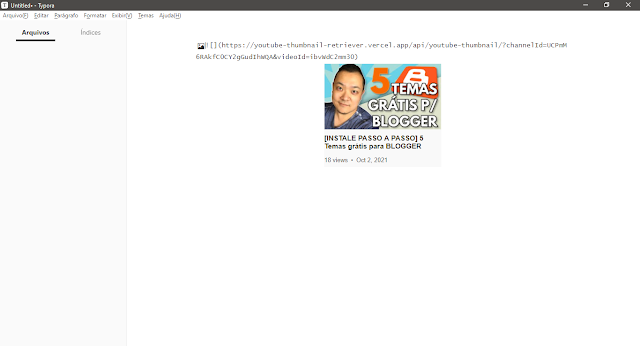
Based on our previous post, we've already managed to bring up an automatically updated listing of the videos we've released on our YouTube channel. But the customization we've done is still very simple, with just the video title and the link.
 |
| It's not bad, but it could be prettier... |
In any case, the script that updates this listing is here:
 |
| Our current script |
To change this view, we will need to create a new template for the video that will be uploaded. In the documentation of the repository of this script the author mentions that without the template option, the script uses the pattern which is a markdown in the following format:
For our purposes, we're going to use the template option we already mentioned above, custom_tags and max_post_count. What does each of them mean?
- template: format the result will be displayed
- custom_tags: we can use this to create custom variables, with information we get from the address accessed in the feed_list
- max_post_count: how many results will we retrieve
In our GitHub file we have a few comments on each line with what's relevant, but basically we have this:
As you can see, we were able to access a lot of possible information in this script and pass it to the template, and that's what we'll take advantage of to get a more sophisticated result.
To improve the visualization, you can use a service like
Code Beautify.
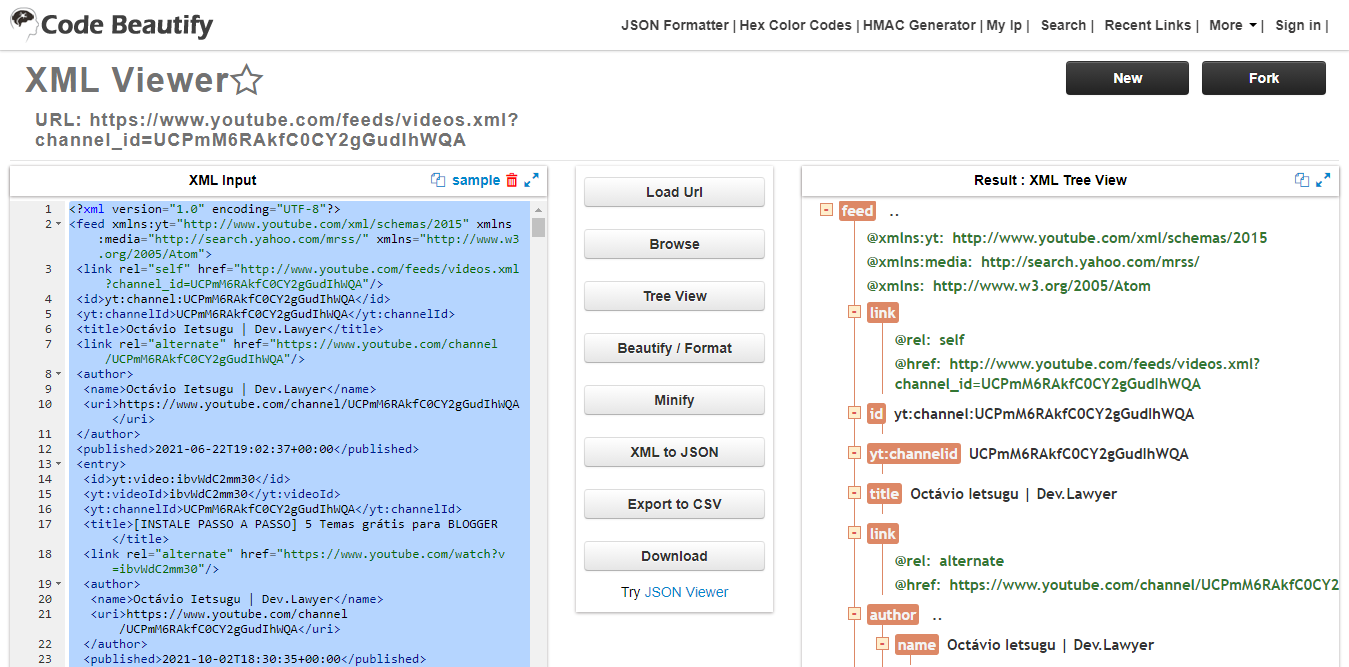
 |
| Beeeem melhor pra visualizar tudo 😀 |
So let's get the information needed to bring YouTube data to our page: we first need to get the main information needed to build this thumbnail based on the response that the feed_list brought us, as we can see there in Code Beautify mentioned above. At the outset, the information we can use is: video title, video id, publication date and thumbnail.
In the case of the title, videoid and publication date, it's ok, since the information we want is there. For the thumbnail this is a little more complicated since the image address is inside an XML tag tribute and, as far as I've seen, it's not possible to get this information using the script with custom_tags automatically (the same problem happens with the views of the video).
To get around this, notice that the thumbnail address is made up of a default address, with the video id part of the address. Let's use this to get the images. After some tests, I realized that we can get thumbnails with a little lower resolution (and enough for our case) from the following address: https://i.ytimg.com/vi/{video id}/mqdefault.jpg
Our template also accepts HTML (since it will output in Markdown), so we've come up with the following format for the template:
And when I ran this script, the YouTube profile videos section on GitHub looked like this:
Progress! We now have the thumbnail images of the channel's videos and the title of each one.
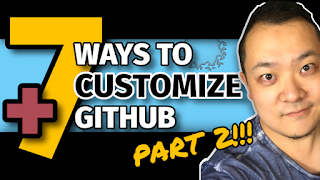
It's not that bad, but it would be nice if we could have a format closer to what YouTube has. Something like this:
And how can we assemble something like this?
As mentioned before when talking about the header and CTA of the page, we are restricted to what GitHub allows us to insert in our markdown and, in particular, we are restricted from using CSS or javascript. So, the most we could do in this case is to create a table to place the image, resize it and that's it.
But, just like we did before, it would be possible to insert an image with the source (src) pointing to an SVG. In this SVG we could use a whole style, formatted as we need. The question here, however, is how we can pass the information we have to the SVG in order to build a dynamic SVG.
I'll be honest with you, this was not an easy task to do. It took me almost two days to discover the limitations that GitHub offered to include images like this and to finally build a solution. The advantage is that I learned a lot in the process and I'm going here to show you how I did it step by step.
If you are new to the world of programming, you may find the following section too complicated, but I will try to be as didactic as possible. My recommendation is that you try to implement and read the comments I left in the archives. It's all on GitHub, which I link here in this text.
How to create a dynamic SVG to use as an image on GitHub
As we made the header with CSS in item 2 of this article, I imagined it would be something very similar: assemble an SVG that had the operations inside a <foreignObject> tag and that's it. But I was wrong: Markdown is able to use CSS made like this, but for it it doesn't process the Javascript code that we put there. It might sound silly, but I spent a lot of time trying to make it work that way, and you can see the SVG I originally planned to use commented out here (in Portuguese):
The file is all commented out and you can follow what I mentioned in the file as the logic used to build the SVG we want, but basically we have:
- a basic SVG structure, which assembles the "frame" that the image has to have to appear as we want: this includes the border, thumbnail size, title and view and date information, which are nothing more than "placeholders" for dynamic information that will be obtained. Styles here are defined inside the <foreignObject> tag, as we did with the header.
- Javascript function that takes the ID of the YouTube Channel and Video we are interested in, and makes a new XML request to YouTube (yes, unfortunately we would have to make that request for each image and filter the result given the limitations of the third-party script that we are using to feed the README with this information);
- once we have the information, the script would replace the placeholders in the SVG image with the data we are looking for.
That's it, apparently simple. I left the original file here because I believe that following the logic that was used is very illustrative for anyone who wants to learn.
But as I mentioned, it didn't work: GitHub (not even the separate Markdown editor like Typora actually) can't read and process this script in a way that works in the README. You can, however, make this image work right in the browser.
To test it, you won't be able to open the SVG file directly on GitHub (because they block the execution of scripts) and neither will you simply open it in your local browser directly (due to CORS error), check this out:
 |
| GitHub blocks scripts from running |
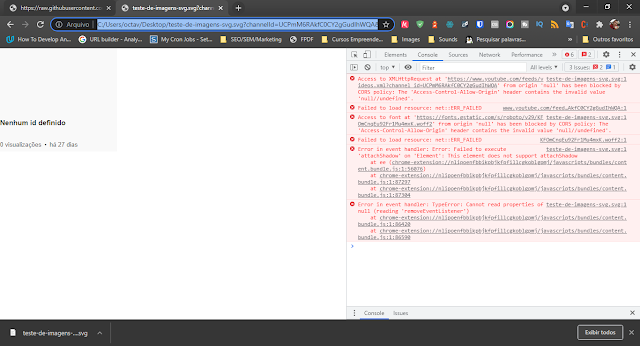 |
| Using locally in browser doesn't work either, due to CORS error |
To test, you need to download file from GitHub on your local machine and when opening in VSCode, for example, load it with the extension Live Server.
Also see our code editor video, where we talk about this extension:
By right-clicking on the VS Code and choosing "Open with Live Server", you will be able to load the file correctly:
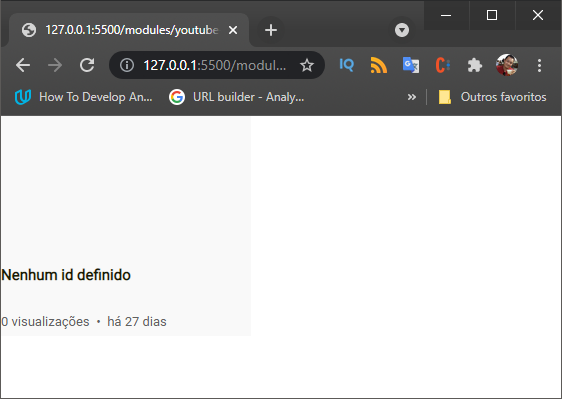 |
| Our layout has already loaded |
And to run the script, we need to pass two parameters: the channelId (Channel ID) and the videoId (Video ID), both of which you can get on YouTube. The browser address looked like this:
http://127.0.0.1:5500/modules/youtube-thumbnail/teste-de-imagens-svg.svg?channelId=UCPmM6RAkfC0CY2gGudIhWQA&videoId=ibvWdC2mm30And then:
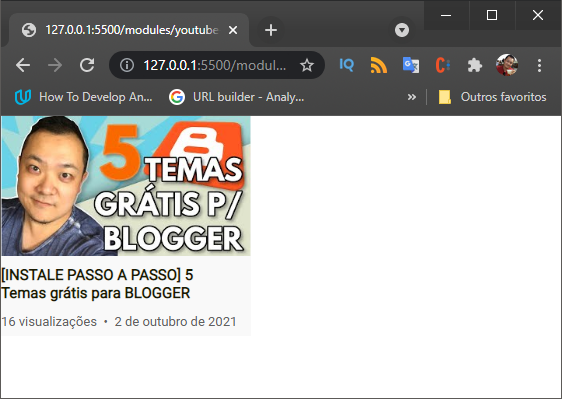 |
| It works! |
As we can see, our SVG works as we want and automatically assembles our layout with the information from the video we've taken. But still, despite opening in browser, if you try to open it in Markdown it won't work. Check it out:
 |
| I've inserted the same file with the parameters in a Markdown and nothing |
This leads me to believe that Markdown cannot, as a browser does, "run" the scripts that are inside the SVG before rendering it to the screen. This makes a lot of sense if we think that in the header we were able to put the styles in the SVG but it wasn't even possible to use an external background image (everything has to be inside the SVG file and, in that case, we used the base64 image file so we don't need external interaction).
OK, so what's the solution?
TL; DR;
Using HTML:
<img src="https://youtube-thumbnail-retriever-sigma.vercel.app/api/youtube-thumbnail/?channelId=YOUTUBE_CHANNEL_ID&videoId=YOUTUBE_VIDEO_ID">
or Markdown:

where YOUTUBE_CHANNEL_ID is your YouTube Channel ID and YOUTUBE_VIDEO_ID is your video ID.
The complete solution (for those who want to understand and replicate)
The only way I can think of to solve this problem is to pre-process this SVG on a server separate from GitHub. Let me explain: let's put up a server that runs these scripts when we request it and, in return, return the SVG ready, with all the information we need.
a. Creating a repository for our "server"
The first step is to create a repository on GitHub to store these files that will make up our server, as well as serving as version control for our code.
Create your new repository on GitHub and in terminal (or Git Bash if you are on windows), clone the repo locally.
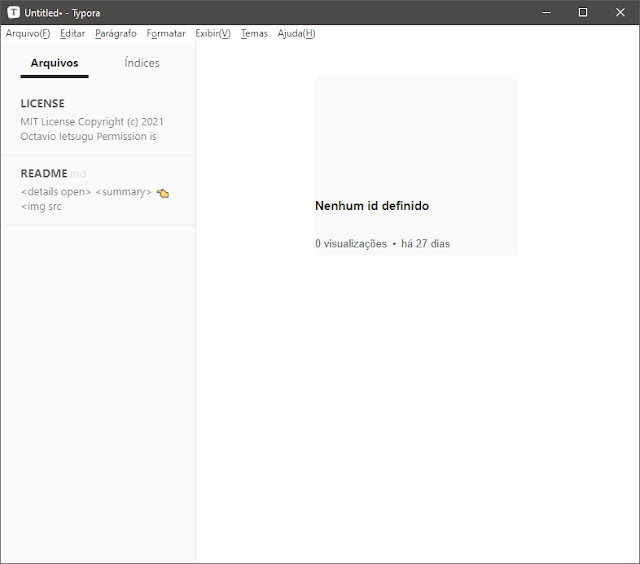
Then, for testing, create an index.html file with whatever content is in it (a "Hello World" should do it) and do a git add -A, git commit -m 'initial commit', and git push. With that, your repository should already have this new file and we are ready for the next step
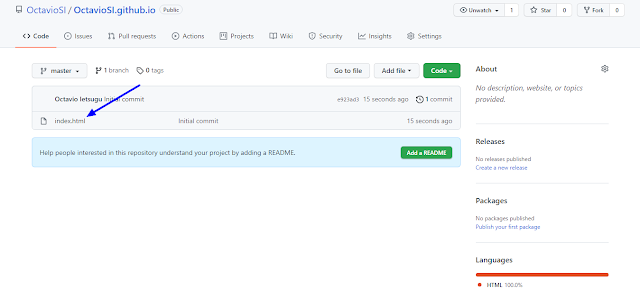 |
| Our working repo 😉 |
b. Enabling a "server"
The second step is to create an account with some service that allows us to host our files so that we can run the codes in javascript. A free alternative to our goal is
Vercel. Register on Vercel, using your GitHub account as a registration login:
Create a new Project and import our newly created repo.
 |
| Click "New Project" |
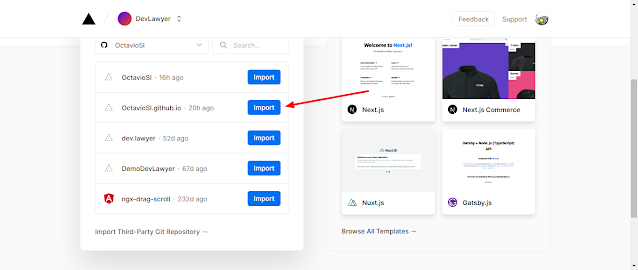 |
| Import your repo |
After importing the repo, there is not much to configure for this project. You can simply click "Deploy". Once created, your project will appear on the Dashboard and will automatically be connected to your GitHub. In other words, when you change your code on GitHub and push it, Vercel will automatically "publish" your code, with an updated online address.
By clicking on your project card in Vercel's Dashboard, you can also configure other options. By clicking on "Settings" and "Domains" you can enter your own record there, just set up a CNAME record at your domain provider.
See our video on this here:
c. Preparing an API
The point of having a service like Vercel hosting our code is to be able to access an Internet address that is able to process an order and return an expected result. This structure that receives a request and returns a result is our API.
We will detail the concept, operation and implementation of an API in future content, but for our content today, just understand that we have to create a structure on our Vercel server so that we can send the Video ID code and our hosted function there process this and return the mounted SVG to us.
What our repository does is install Express.js, which is a web application framework on Node.js servers. In other words, this program provides a framework for us to run a web application on a server that supports another framework called Node.js.
I don't think it makes sense to pass code line by line here (since it's an article about GitHub customization and not API setup) but in general terms, what do we do?
- We created an API framework, which allows me to access the address: https://youtube-thumbnail-retriever-sigma.vercel.app/api/youtube-thumbnail/?channedIl=CHANNELID&videoId=VIDEOID
- When accessing this address, the route from the routes/youtube-thumbnail.js file that provides a "get" method, that is, it allows requests for information, calls another function getYTThumbnail which is in modules/youtube-thumbnail/main.js
- Finally, our function accesses the YouTube server, takes the necessary information and returns a giant text that is nothing more than our already formatted SVG
The above is an oversimplification, obviously, but it's the logic behind what I've done. If you copy all the code there and upload everything to your repo, Vercel will install and make everything available automatically, and you can use that Vercel address as the source of your repo image on your GitHub profile.
You can use this same address in your README, and it will work too:
 |
You can use our address as source for your images
|
Finally, our GitHub profile with the images of the uploaded videos (using this addresses as image sources in our template of GitHub Actions) looks like this
Wow! That was a LOT of work 😅
We now have a very customized GitHub profile. As I said in our last tutorial on this subject, it's up to you to use common sense and creativity to make your GitHub profile unique and, above all, attractive for the objective you seek.
Happy coding!
/* End of the post, see you next time */
 Versão em Português


![[PART 2] 7+ ways to customize your GitHub Profile (README)](https://blogger.googleusercontent.com/img/a/AVvXsEhu6qfaJDDe4yUaRRK6TtjUAAwfTaRaINLvz6LiysN5bMQbgInvWQXb3PO3wf3lIjBzQszHLi0SBW3pA4jc9jIfbf5VPcqwamT7y1SOTX4ejFgx_DCMCqnegSBEPLrF3I2iAZ8I-_DHTwffg9ozGfwtvedJG5VDYIh_UPnrMoUbZuUQWJh-ImcVF5t3Ew=s72-c) Reviewed by Octavio Ietsugu
on
October 15, 2021
Rating:
Reviewed by Octavio Ietsugu
on
October 15, 2021
Rating:


ReplyDeleteFactEcho’s reporting is refreshingly honest and thorough. Every article provides meaningful insights into world affairs, business, and technology, helping readers stay informed with clarity and reliability in a news landscape often clouded by sensationalism.
I appreciate how TimesofSingapore merges breaking news with cultural insights and global perspectives. It’s a platform that keeps readers not only informed but also engaged, providing a nuanced view of the world beyond Singapore.
ReplyDeleteTimesofFinland offers a perfect combination of local and global perspectives. Their dedication to exploring cultural nuances, innovative trends, and regional affairs makes their reporting both unique and highly relevant to today’s informed audience.
ReplyDeleteVery helpful guide for beginners. I really enjoyed reading your blog post.
ReplyDeleteAnchor Text:Visit Here