 Versão em Português

Today we will talk about CODE EDITORS for WEB PROGRAMMING, what you should watch out for when choosing this tool which will follow you from now on and some tips on how you can use and configure your editor.
Also, follow me on GitHub and also Dev.Lawyer's profile so that you can have instant access to all the content I am posting here.
Watch here: https://youtu.be/h73ZVeWRsj4
All set? Follow me then.
What is a Code Editor?
Se você tem interesse em codar, já deve ter se deparado com muitas recomendações de programas para escrever o seu código. A discussão sobre qual o melhor editor de código costuma ser polêmica, com cada programador indicando a sua preferência como a única alternativa viável, mas vamos ser objetivos: o melhor editor de código é aquele em que você se encontra melhor, sabe os atalhos e consegue, enfim, trabalhar mais rápido.
If you're interested in coding, you've probably already come across many recommendations for programs to write your code. The discussion on which is the best code editor is often controversial, with each programmer indicating their preference as the only viable option, but let's be objective: the best code editor is the one you are best at, know its shortcuts and can, well, work faster.
Depending on the programming language you want to study, there are specific editors with even better features that help you develop your program. For example, if you're developing in Python, you might like PyCharm. If you want to program in Java, you can possibly find advantages when using Netbeans. The possibilities are plenty.
For web programming, however, I recommend that you start programming using a Code Editor that is light and functional, with good integrations that will help you to conduct a more efficient work.
A Code Editor can even be your regular text editor, like Notepad, but it's interesting to look for some program that at least brings you good syntax highlighting functionality. What does that mean? It means that the Code Editor can highlight different parts of the "grammar" of your code, improving its understandability.
Is the Code Editor an IDE?
Have you ever heard of IDE? IDE stands for "Integrated Development Environment" and it aims to provide more functions than a Code Editor. As a rule of thumb, an IDE has more features that can help you program (it may contain emulators, compilers, other libraries, etc.) in addition to the existing code editor itself.
The Code Editor, on the other hand, has a simplified approach, being only a text editor with "something extra" -- normally, syntax highlighting and integrations that help you to program.
Our recommendations 😎
For Web Programming you will find several options of Code Editors, but find below some very famous and most used code editors today, all with Windows, Linux and Mac versions:
1. Visual Studio Code (free, open source);
3. Sublime (paid, but it has an evaluation version without time constraints).
These editors already have syntax highlighting for most common languages, and if they don't, you can simply install new syntax through plugins in the editor itself. With either option, you will certainly be well taken care of.
To install, simply access the corresponding website, download and follow the installation instructions. For my projects I used Atom for a long time, but given that (i) in a preliminary research I noticed that many developers are using VSCode, and (ii) it is possible to install a plugin to use the same Atom shortcuts in VSCode (Atom Keymap) I'm going to show you here the basic aspects and settings you can do to prepare your machine for development using VSCode.
VSCode: a brief tour
So let's go through the main features of one of the most used Code Editors for Web programming today: Visual Studio Code (VSCode). In this brief tour we will show you what is most important features for your starting projects. Below is the splash screen you'll come across when you open the program for the first time:
 |
| VSCode |
1. Activity bar
 |
| What we will see today |
a. File Explorer
The first menu is the File Explorer, which will show you the structure of your project in tree view. To open a project file, just click on its name and it will open in the space on the right:
 |
| File Explorer |
b. Source Control
The second option is the srouce control. Instead of using Git from the terminal to give the necessary commands, you can do that here. You can do git commit, push, pull and everything else.
 |
| Version control using Git inside VSCode |
 |
| Changes and differences between versions |
Not sure how Git works? See our past content on the subject here: How to use Git and GitHub: a step-by-step dummies' guide
c. Extensions
The last menu we'll show you is Extensions. It allows you to expand the usefulness of VSCode with interesting features.
You can add support for programming languages that are not pre-configured in the editor, for example, but there are still many other interesting features that are worth exploring. We will suggest some here in this content.
 |
| VSCode Extensions |
2. Command Bar
The Command Bar contains all existing commands in VSCode and can be very useful in your day to day operations. To access it, just press Ctrl + Shift + P and the bar will open. You can also open it from the View > Command Pallete menu, but the keyboard shortcut is easier to access once you know it.
Some interesting commands you can look for in the command bar (and what to type to find the option quickly):
zen (toggle View: Zen mode) - ZEN mode. It takes distractions off your screen by letting you focus only on the file you're working on. To disable it, just press Ctrl + Shift + P again and type zen to open this option.
theme (Preferences: color theme) - Themes. You can change the VSCode color scheme to any of the available themes as per your preference. But please, unless you are a psychopath, use a dark theme. Your eyes will thank you.
format (Format Document) - Format document. This option allows your code to be "tidy" in terms of spacing, skipped lines and other visual aspects of organization. It is very useful to improve its visibility and keep it well organized.
terminal (View: toggle Terminal) - Open Terminal. Here you have a quick access to the terminal, which can be very useful to run some necessary commands.
3. Status Bar
The status bar brings some important information, like the "branch" you are working on your Git project (we'll talk more about this later), errors and warnings from your program, programming language of the current file and notifications.
| Status Bar |
4. Terminal
In VSCode, you can access the terminal by clicking the errors and warnings icon in the status bar and clicking TERMINAL, or you can access it from the command bar by pressing Ctrl + Shift + P and typing "terminal" (View: toggle Terminal).
The terminal is something that may seem intimidating at first, but over time you'll see that it's your biggest ally. Commands given at the terminal save a lot of time when used well.
The fact that VSCode has direct access to the terminal in its interface is a big surplus.
 |
| VSCode Terminal |
VSCode: Some additional settings
1. Connect your GitHub account
 |
| Synchronizing VSCode on multiple devices |
2. Indentation
 |
| Standard Indentation |
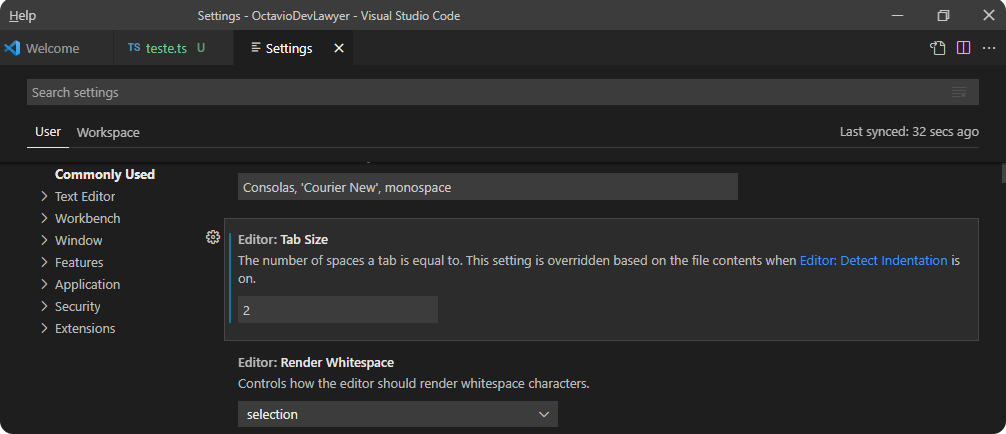 |
| Changing indentation spacing |
3. Changing the terminal (Windows)
If you don't have Git installed on your machine, see the content below: How to use Git and GitHub: a step-by-step dummies' guide
 |
| Setting the default terminal profile for Windows |
Now open the terminal again by pressing Ctrl + Shift + P and typing "terminal" (View: toggle Terminal). Click the "+" button and select Git Bash. Once opened, you can even delete the existing powershell profile by clicking on the trash icon.
 |
| Enabling Git Bash for the Terminal |
 |
| You can now delete the profile for powershell |
VSCode: Some interesting extensions
 |
| Installing Python Language Support |
 |
| Live Server |
 |
| CSS Peek |
 |
| Auto Close Tag |
 |
| JavaScript (ES6) code snippets |
 |
| ESLint |
 |
| Prettier |
 |
| Better Comments |
 |
| Blockman |
Conclusion
 Reviewed by Octavio Ietsugu
on
August 13, 2021
Rating:
Reviewed by Octavio Ietsugu
on
August 13, 2021
Rating:


Constantly amazed by how Newsgossips manages to deliver such varied content so effectively! The platform lives up to its promise that every headline matters by providing breaking news, trending gossips, and top stories with remarkable consistency.
ReplyDeleteGenuinely appreciate the effort behind TechTrichy and its commitment to excellence. The fast-loading pages, well-organized categories, and insightful articles create an unmatched reading experience. This is how tech news should be presented in the modern era.
ReplyDeleteI'm absolutely thrilled with NewsForth and its commitment to delivering verified news daily. The coverage spans politics, business, and tech seamlessly. Every headline is timely, well-researched, and presented with clarity that keeps me returning for reliable updates consistently.
ReplyDelete